Background

Friday 17 May 2013

Lampshade Tutorial - Simple And Complete


This is a complete guide to covering your lampshade. 


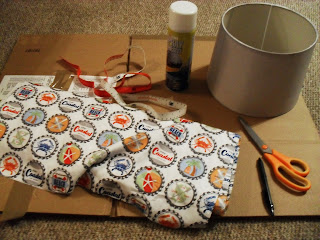
Step 1: You need 100cm x 50cm of fabric for a 19 Centimetre Depth Shade. You also need a pair of scissors, an old lampshade, Silicon Spray Adhesive Glue (The stuff the use to lay carpets with, make sure non flammable) a Large piece of cardboard to protect your house, a Pen and a tape measure.


Step 2: Lay your fabric down flat, Pattern to the floor. Take your lampshade drum and place it in the left hand corner Inch from the edge leaving a seam allowance. Your drum should have a joining strip use that as a guide.


Step 3: See the Joining Strip that is what I'm going to use as a guide, place your pen below your shade and slowly roll your shade and at the same time mark all along the bottom, This is how you get that fabric to fit perfect your potentially awkward shaped shade.


Step 4: Once you have rolled it all the way to the join (or when you have rolled a full 360 degrees add an extra 2 centimetres as a seam allowance) Do the same for the top of the lampshade all the way back to the start. Just do it slow and steady and remember your lines don't need to be perfect.


Step 5: It should look something like this in the picture, just to double check you have made it the right length measure your drum from top to bottom and then place that against your outline of your fabric (so basically my drum measures 19cm top to bottom and the lines I have drawn pictured here are 19cm's apart) when you have done this, take your tape measure or as a rough guide, add 2cm extra to your drawn pattern on your fabric, this again allows for seam allowances to make it nice and neat. Now You Can Cut Out.


Step 6: Take your lampshade the spray adhesive and the box. Place your hand in the centre of the lampshade, else this could be messy, use the box under the lampshade to catch any stray glue instead of your carpet. Spray evenly your adhesive glue using your hand to turn the lampshade as you go. Once the entire drum is covered place stood up on your box.


Step 7: The clock is ticking now, place your cut out fabric pattern down and spray the entire piece evenly from left to right.


Step 8: You have a couple of minutes to get this right and it's a little fiddly, as the glue sets, I find the best thing to do, is with your sticky piece hold each end out and place lightly around your lampshade. Then use your hands to stretch the entire piece of fabric out and even a cloth to get rid of any bubbles. The easiest fabric to use is Cotton Duck, Cottons tend to be a lot more fiddly but you will get there, you can lift and replace, lift and replace as you work your way around.


Step 9: Once you've got it how you like it, with the remaining piece of fabric your going to turn it into a seam.


Step 10: With your adhesive spray or a glue gun. Spray just underneath the seam and push down to hold in place, use a towel to flatten out firmly.


Step 11: Tidy up time, with your spray adhesive, lightly spray under all the extra fabric hanging over the edge and fold it over the lampshade, the next picture shows you what it will look like as you go.


Step 12: Keep folding all the seams and spraying underneath as you go. Sometimes this can be a bit fiddly, I do find it easier to use a glue gun but not everyone has one of these, so for now we will use this method.


Step 13: Your nearly there, do the same for the top of the lampshade, folding and spraying the adhesive as you go. Allow to dry for at least an Hour before using.

You should now have a complete lampshade. yum JUST LIKE THE PICTURE! Maybe A Slightly Different Fabric :) x


Saturday 29 December 2012

Busy mitts with technology

It's been a while since I've posted but here are som of the things I have been making recently, Christmas is a very busy time of the year despite the weather you,d think you would have plenty of time to sew but it is not the case at the moment. I've been making ipad covers, iMac covers and sewing machine covers. Embracing new technology in full crafty know how, what a lovely mix. X


Tuesday 23 October 2012

Another Stunning Day at the Office!

Look at what arrived today! A whole stash of delectable fabrics! It'll be a struggle to part with these, I'm sure. I'll have to make a cushion in every fabric by the end of the week, or I might just pop. You want to peak? I know you do. 

Heres a little snippet of my new arrivals. You can purchase all of these at http://stores.ebay.co.uk/Patchwork-Paradise

I've put them on a special 24 hour listing! Grab a bargain. Happy Stitching x


Friday 19 October 2012

Tampering with Tapestry!

I've been at my machine today, a colleague asked me to turn her tapestry into a cushion. So here's what I came up with, I wasn't overly keen on the tapestry and felt it lacked a little life but now it's had a face lift it looks tempting enough to put on my sofa, although I am sure she'd want it back! I've used Tilda Molly Blue and Inca Blue fabrics for this cushion, which I sell in my shop. You only need a very small piece of something gorgeous to turn it into something worthy of a place in your home. Have a good day and happy stitching. x


Thursday 18 October 2012

A little update and welcome to Patchwork Paradise!

It's been a while since I have had time to catch up with you all but here is a quick update. The last couple of months have been manic, working, working and well more working. I've been setting up my only little business and it's finally hit off the ground and I'm very proud to announce, I have opened a shop where we specialise in smaller pieces of fabric for patchwork and small home furnishings. We stock a lovely range of fabrics from Michael Miller to Tilda and even a little bit of Cath Kidston. Although busy I have managed to finish a couple of stitching projects and here they are for you all to see:


 I've had a real passion for making lampshades recently and this one I sewn by hand, I simply love it for it's vintage but retro style.


I've finished my Emily Peacock Cross Stitch and I'm very happy with it, it's looking rather beautiful next to my handmade bunny, given to me as a gift from my little sister.


I've even tried more modern lampshades, added a bit of Ric Rac and walla! The lampshade looks simply gorgeous, best part is, you can use absolutely any fabric you love, to customise it to suit your home.

So I've been very busy. :)

My little fabric store is called Patchwork Paradise and you can find some lovely fabric bargains and advice from me when ever you need it.


Some of the beautiful fabrics me and my husband stock are shown below. :) Happy Stitching to you all.


Thursday 10 May 2012

How to Make A Bolster Cushion - Quick and Easy

Despite my busy schedule, I have managed to do my first tutorial for you on how to make a lovely bolster cushions. They are absolutely fabulous and increasingly popular. I hope you like it and it makes sense. I don't have a brilliant camera, so I've had to make do with so so pictures.

WHAT YOU NEED:

Sewing Machine
Fabric
Thread
Ribbon
Tape Measure
Pins

To start with decide the width you want your cushion to measure, mine is just under a metre in length each fabric piece has a 25cm width. Then take your various fabrics and measure 55cm's in length as shown.


I had 4 pieces measuring 55 x 25cm. Line up your fabrics in the order you want them to appear on your cushion and then sew a straight stitch for each length of fabric making sure that the pieces are back to back (as shown below)


Make sure you repeat the instructions for all your pieces of fabric depending on how much you want for your cushion. 

After you have joined all your fabric together, on each end fold the fabric over by 1.5cm and straight stitch with your sewing machine from top to the bottom.


Next: fold your fabric so that it is inside out and straight stitch the entire length of the fabric. Turn your fabric right side out and you should have a nice long tube.


Next: squeeze one end of your fabric to form a neat flower as picture below and pin into place. Hand sew this so that it holds. 


Next time to stuff. This is awkward due to the shape. Try to give the stuffing a real good beating before sealing and roll your bolster cushion like a rolling pin. Don't be afraid to beat it senseless to get it just how you want it. A tip is to take stuffing and place it where you can see there are gaps in your cushions to fill it properly. It should look something like this.


With the other end of the fabric repeat the method as above. Make another flower and pin and sew into place.


Give your cushion a good wack! Finally as a finishing touch I put some coordinating ribbon on the ends of my cushion and I am very happy with the results. I hope yours turns out nicely. I'm not very good with instructions but I thought I'd have a go. Hope you like it.