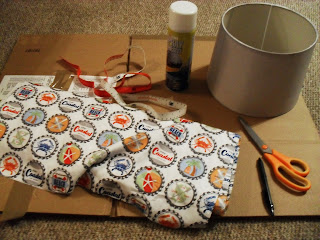
This is a complete guide to covering your lampshade.
Step 1: You need 100cm x 50cm of fabric for a 19 Centimetre Depth Shade. You also need a pair of scissors, an old lampshade, Silicon Spray Adhesive Glue (The stuff the use to lay carpets with, make sure non flammable) a Large piece of cardboard to protect your house, a Pen and a tape measure.
Step 2: Lay your fabric down flat, Pattern to the floor. Take your lampshade drum and place it in the left hand corner Inch from the edge leaving a seam allowance. Your drum should have a joining strip use that as a guide.
Step 4: Once you have rolled it all the way to the join (or when you have rolled a full 360 degrees add an extra 2 centimetres as a seam allowance) Do the same for the top of the lampshade all the way back to the start. Just do it slow and steady and remember your lines don't need to be perfect.
Step 5: It should look something like this in the picture, just to double check you have made it the right length measure your drum from top to bottom and then place that against your outline of your fabric (so basically my drum measures 19cm top to bottom and the lines I have drawn pictured here are 19cm's apart) when you have done this, take your tape measure or as a rough guide, add 2cm extra to your drawn pattern on your fabric, this again allows for seam allowances to make it nice and neat. Now You Can Cut Out.
Step 6: Take your lampshade the spray adhesive and the box. Place your hand in the centre of the lampshade, else this could be messy, use the box under the lampshade to catch any stray glue instead of your carpet. Spray evenly your adhesive glue using your hand to turn the lampshade as you go. Once the entire drum is covered place stood up on your box.
Step 7: The clock is ticking now, place your cut out fabric pattern down and spray the entire piece evenly from left to right.
Step 8: You have a couple of minutes to get this right and it's a little fiddly, as the glue sets, I find the best thing to do, is with your sticky piece hold each end out and place lightly around your lampshade. Then use your hands to stretch the entire piece of fabric out and even a cloth to get rid of any bubbles. The easiest fabric to use is Cotton Duck, Cottons tend to be a lot more fiddly but you will get there, you can lift and replace, lift and replace as you work your way around.
Step 9: Once you've got it how you like it, with the remaining piece of fabric your going to turn it into a seam.
Step 10: With your adhesive spray or a glue gun. Spray just underneath the seam and push down to hold in place, use a towel to flatten out firmly.
Step 12: Keep folding all the seams and spraying underneath as you go. Sometimes this can be a bit fiddly, I do find it easier to use a glue gun but not everyone has one of these, so for now we will use this method.
Step 13: Your nearly there, do the same for the top of the lampshade, folding and spraying the adhesive as you go. Allow to dry for at least an Hour before using.
You should now have a complete lampshade. yum JUST LIKE THE PICTURE! Maybe A Slightly Different Fabric :) x


No comments:
Post a Comment